
Honey Comic Strip Template for Procreate (Updated!)

Do you want to get your own comic strip going but don't know how to start? This template will give you all you need to jump in and start creating your own strip. Maybe your interested in making daily diary comics or you’d like to start a regular webcomic in the classic strip format.
Over the years I have made diary comics on and off. I wanted to create a template that made it easy to pick up this diary comic practice again. After some trial and error I landed on this template. I went through a few variations, but I landed on a winner once I added the notes area underneath the panels. This is essential for writing notes and plot point to help your comics strip start to take shape. I tested it out over the course of a month and it worked so good I decided I needed to share it.
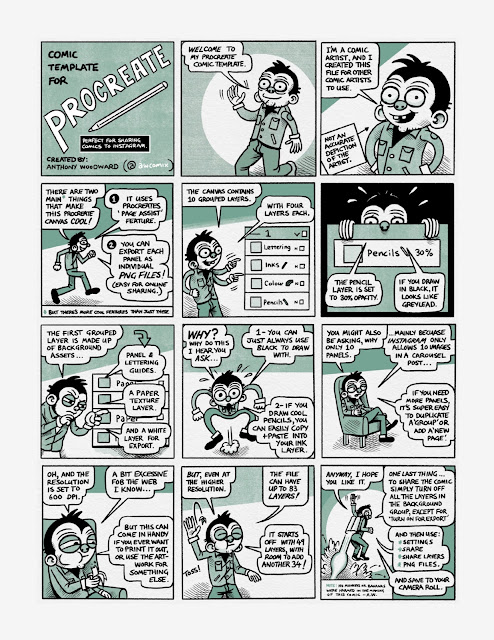
The template contains seven grouped layers, one for each day of the week. Each grouped layer contains three layers for lettering, final art, and the rough sketch. It use the page assist features for easy exporting.
I like working in a higher resolution (600DPI) so I have the option to print the art later. You may wish to lower the DPI or use the Lite version (300DPI).
The template is designed to get you started with your own comic strip with panel samples, guides and a lettering guide. I have also included a paper texture and colour layer to demonstrate the type of backgrounds effects.

Note: Some older iPads can't open the main file. I have included a stripped back 'Lite' version for these devices.
Instructions
- This template is designed to Expedite making comic strips. There are 7 grouped layers for panels. One for each day of the week. It include a notes area at the bottom to jot down a rough outline, plot points, or write general notes.
- It uses the page assist feature so you can easily scroll through panels using the thumbnails at the bottom of the canvas and export with ease.
- Each grouped layer contains three layers for Lettering, final art, and rough art.
- The rough art layer is set to 30% opacity. You can draw in black and it appears grey.
- there are background guides such as, a sample panels, lettering guide, panel guide, paper texture Sample, and a colour background. The file is set up as an example for you to use how you wish, you may prefer more of less layers for drawing your comic, IE a colour layer. You will probably want to recreate your own panel examples using your preferred brush and line weights. The same goes for the paper texture and colour for export. Feel free to delete these and add you own backgrounds to suit your own work.
- To save your panels ensure only the panels you want are visible. For example turn off your rough art layers.
Then go to, settings>share>share layers>png files>save to camera roll.
Once exported you can crop out the notes area by editing the image in your photos app or app of choice. I recommended unsquared to crop long panels or panels that aren’t square if sharing to Instagram.


Comments
Post a Comment